Frequently asked questions
Welcome to our Frequently Asked Questions page. Here you will find a comprehensive list of answers to the most frequently asked questions regarding Amplivox equipment. If you can’t find the answer you are searching for, please contact our team on +44 (0)1698 208216 or email.
Audiometry
This will be different depending on your audiometer. For the majority of Amplivox devices however, please press and hold the ‘MENU’ button and then press and hold the ‘TALKOVER’ button. The internal instrument serial number will then be displayed on the screen.
A procedure to check that everything is working correctly is required before you start testing. The OSHA standard on this subject does not enforce you to use an electro-acoustic ear simulator, but states that a daily check should be performed to ensure the audiometer is working correctly. You could use an electro-acoustic ear simulator or a known hearing level such as your own hearing level as part of this.
OSHA’s standard at 29 CFR 1910.95(h)(5)
(i) The functional operation of the audiometer shall be checked before each day’s use by testing a person with known, stable hearing thresholds, and by listening to the audiometer’s output to make sure that the output is free from distorted or unwanted sounds. Deviations of 10 decibels or greater require an acoustic calibration.
Our recommendation would be that a daily check includes:
- Straighten any tangled leads. Ensure all connections are firm and giving good contact
- Check all knobs and switches are secure and function in a silent, smooth, click-free manner
- Check the function of the response button
- Check the tension of the earphone headband
- Run an audiogram on the verification device to check responses are accurate to previous checks.
Alternative – Daily Audiometer Checks – doing it yourself
- Approximate calibration checks can be made using your own audiogram
- Check the output levels for all tones to 10dB above your known threshold
- Repeat for each earphone
- Check at approximately 60dBHL for noticeable distortion, intermittency or other problem
- Check both earphones and across all frequencies
- Flex the leads to check for intermittency due to broken wires
- Ensure the audiometer and its attachments are clean.
Reference equivalent threshold sound pressure levels (RETSPLs) are used when calibrating audiometric equipment to a hearing threshold level of zero at various frequencies.
The values shown in the following document relate to the Interacoustics DD45 supra-aural audiometric earphones with pure tone. These values have been measured by the accredited national laboratories PTB in Germany and DTU in Denmark according to studies commissioned by the William Demant Diagnostics Group.
Fitting the headphones
- Remove spectacles, large earrings and hearing aids. Hair should be swept away from the ears
- The tester should place the red earphone on the right ear and the blue earphone on the left ear
- The headphone should be firmly fitted and the earphones should be centrally placed over the ear canal
- Positioning over the ear canal is particularly important to check when using noise-reducing enclosures as the outer cup may look prefect whilst the inner earphone is not positioned correctly
- The incorrect positioning of the earphone over the ear canal may produce a ‘notch’ of about 10dB on the audiogram at 6khz
Prior to delivery, your audiometer is calibrated to a specific pair of headsets. It is essential the headsets are used only with this audiometer and channel (ear) to which they are calibrated. However, you can change the headset lead without affecting the calibration of your audiometer. Before you start, please note here the audiometer and headset details for reference:
- Audiometer Model
- Audiometer Serial Number
- Left Earphone (Blue) Serial Number
- Right Earphone (Red) Serial Number
- Carefully remove the headband from the earphones
- Work with the blue earphone first
- Choose the correct screwdriver that fits the grub screw slot
- Slacken, but do not remove, both grub screws retaining the left (blue) lead plug from the earphone
- Remove the blue 2 pin plug
- Fit the left (blue) lead plug from the new lead in the earphone and tighten the 2 grub screws finger tight
- Repeat for the right (red) channel
- Re-fit the headband
- Connect the headset to the audiometer and test for sound output at a safe listening level
- You have now completed fitting the headset lead and the audiometer is ready to use.
- Carefully remove the headband from the red and blue shells
- Remove the outer cushion on the red Audiocup assembly
- Directly above where the headset lead connects to the Audiocup, there are two access holes located within the platform ring. Using a suitable screwdriver, loosen the two screws that retain the headset lead (you may need to pull the acoustic foam pad forward to access the screwheads)
- Remove the headset lead from the Audiocup
- Fit the new headset lead and secure by tightening the two retaining screws
- Fit the outer ear cushion
- Repeat tasks 2-6 on the blue Audiocup assembly
- Fit the Audiocup headband.
The Amplivox Audiocup headset assembly is now ready for use.
You can buy a replacement headset but not a spare headset due to the headset and audiometer being a calibrated pair.
Only one AC headset can be used per audiometer. Headsets cannot be used between different audiometers as they are calibrated as a matched pair.
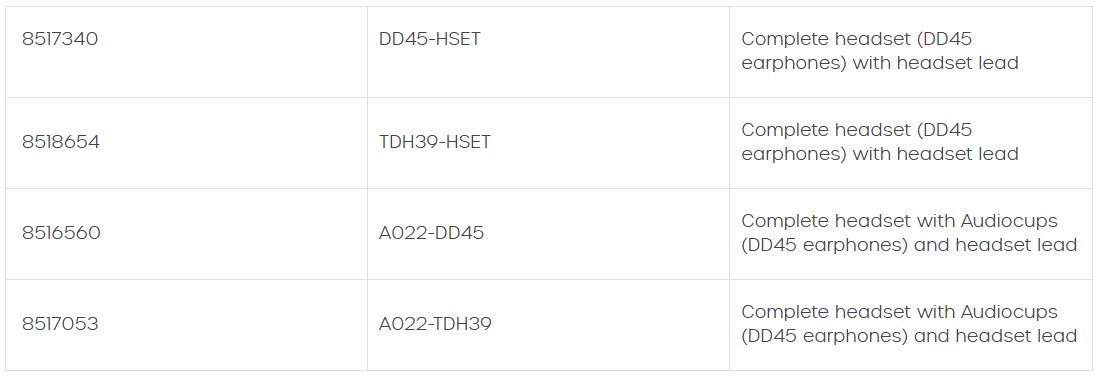
You need to order the correct earphones that your instrument is programmed for. You can order with the standard headband or Audiocups (noise-reducing enclosures).
The HP printers originally sold with older instruments (serial number prior to 17138) are no longer manufactured. We are now able to supply an alternative printer (HP200). To use the HP200 printer, we may need to upgrade your CA850 audiometer. The costs are listed below:

It is not possible to connect multiple Amplivox equipment to a PC at same time when using audiometry software.
Tympanometry
- Boss and Nut - Connection on probe body for attaching nose cone
- Seal - Gasket used to ensure air flow
- Probe tip - Transparent probe tip housing the seal
- Nose cone - Top part of probe to securely fasten probe tip and seal
The small holes through the Otowave probe tip must be kept clear. If these become blocked a warning message will be displayed. The probe tip must be removed and cleaned or replaced.
To remove the probe tip, unscrew the nose cone and pull the tip off the probe boss. A small seal will be found in the base of the probe tip. This should be examined and replaced if it is damaged.
When replacing the probe tip, ensure that the seal is correctly inserted with its flat edge aligned with the flat edge on the probe tip. Push the probe tip over the boss and replace the nose cone. Make sure that the nose cone is screwed home firmly but do not over-tighten. Do not use any tools to tighten the nose cone.
After replacing the tip, a daily check should be carried out, as described in the operating manual.
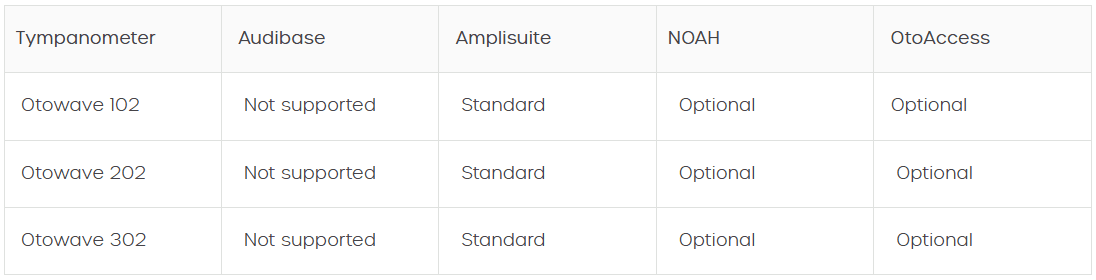
Software
You could be running two types of tympanometry software. This will either be Amplivox Amplisuite or the NOAH impendence module. The minimum specification for NOAH4 can be found on the HIMSA website. The Amplisuite specifications are:
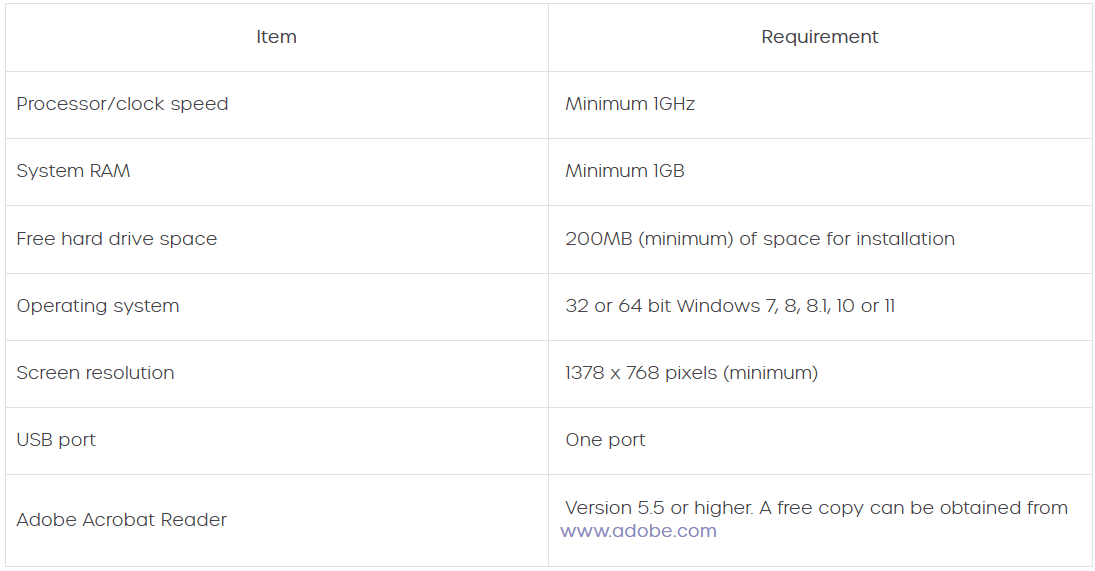
Minimum PC specification for Amplisuite BEEP is the same as standard Amplisuite. If Windows will run on the device, then so will Amplisuite BEEP. The minimum specification is:
- Processor: 1 GHz or faster, one or multi-core
- RAM: 1 GB or more
- Available hard disk space: minimum 200 MB
- Resolution: minimum 1378 x 768
- Graphics device: DirectX 9 with WDDM 1.0 or higher driver
- Available 2.0 or 3.0 USB Port
Operating systems supported are Windows 10 or 11. Amplisuite BEEP will work on a normal PC/laptop, but most end users will use a tablet. It needs to be a Windows based tablet and not Apple/Android.
After installation Audibase needs to be registered with Amplivox before it can be used.
To obtain the registration key, you will need to contact us with the software number, instrument serial number and client name after which a registration key will be supplied.
Please make sure that the letters and numbers in the software number are correctly identified. A quick way to do this would be to highlight the number, press “Ctrl” and “C” together to copy and then paste it into an email using “Ctrl” and “V” together.
Once you have entered the key a sign in box will appear. You may enter a username and password before continuing to the Audibase software if desired.
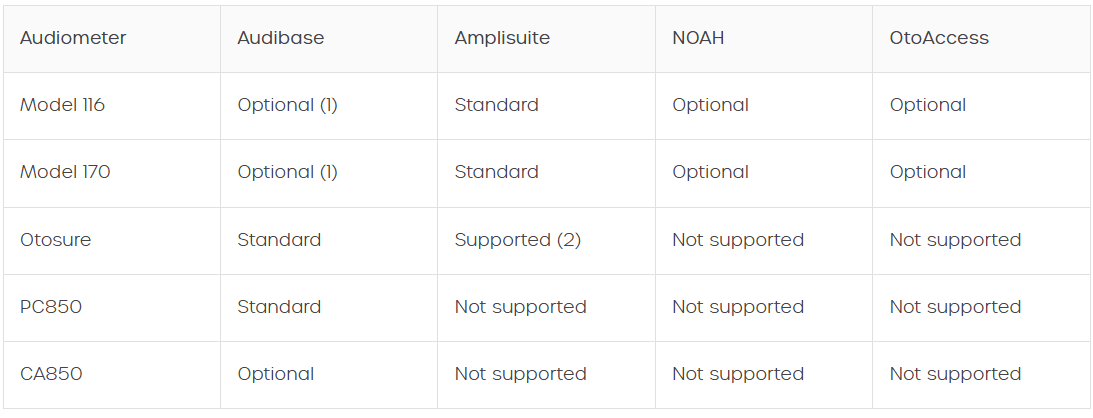
Screening audiometers
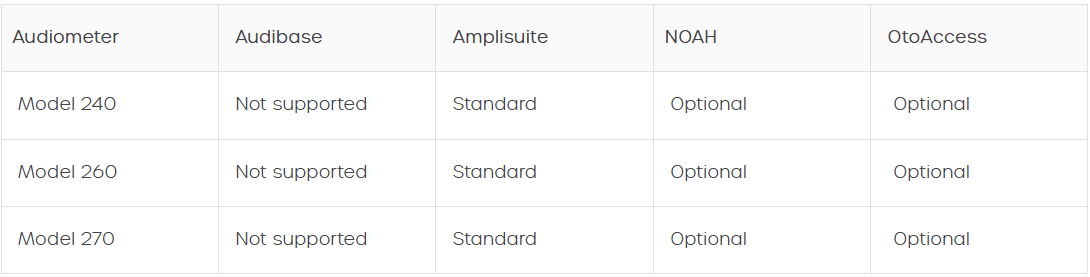
Diagnostic audiometers
Tympanometers
Select the software you wish to download and click the ‘download’ button to commence download. If the software downloads as a zip file, go to your downloads and right click on the zipped file and select “Extract All”. With the software extracted, the setup file can the be ran. Follow the one screen instructions to install the software.
General
IAC Acoustics recommend that each patient should wear a mask and wash their hands before entering the audiology room.
Free Standing Single Occupancy Booths (approx. 1.0m x 1.0m)
Should be thoroughly cleaned in between each patient encounter. All surfaces internally and externally should be wiped down with an acceptable disinfectant. Equipment should be cleaned as per your existing infection control procedures.
Typically, these booths have a small fan built into the roof to draw air from the host space. The air in the host room is thus the deciding factor, assuming this is properly addressed we would recommend leaving the booth door open between patients.
Medium Sized Booths (Adult Clinics)
Should be disinfected as above.
Larger booths might well be connected to a main ventilation system that serves parts of the Hospital. In this case we would recommend leaving the booth empty with the door closed for at least 10 minutes between each patient to allow for one full cycle of air exchange.
Fabric Lined Rooms/Paediatric Rooms
Please do not attempt to steam clean the fabric lining, we would instead advise that patients are discouraged from touching the walls. If a patient were to touch the walls, we would recommend they wash their hands or sanitize with gel. Fabric walls can be sprayed with disinfectant, but this should be done from a distance to avoid soaking the lining. All hard surfaces should be wiped down as above.
Large paediatric rooms should be left empty with the door closed for at least 15 minutes to allow for one full cycle of air exchange.
Carpets within all IAC test rooms should be vacuumed and disinfected daily.
Please note, our recommendations do not guarantee the safety of patients nor should they replace existing infection control procedures.
The device must be cleaned after each use with a damp cloth and a virucide, bactericide, generic fungicide product. FIM MEDICAL recommends a list of wipes or cloths validated with our products.
We recommend asking the patient to disinfect their hands before handling the device or wearing disposable gloves. After each patient, clean the parts accessible to patients, namely:
- Accessible shells
- Device mask
CAUTION: Due to surface treatments on the lenses, DO NOT CLEAN THE LENSES with these products, use only a microfibre cloth.
The lenses are not in contact with the patient at any time during the test.
The use of spray is not recommended as a misdirected spray may damage the lenses.
VALIDATED LIST: 70% isopropyl alcohol / Bactynil® Disinfectant Wipes / Clorox® Healthcare Bleach / Super Sani Cloth® / Mikrozid® AF wipes / Mikrozid® Universal wipes premium recommendations (application times).
Environmental operating temperature: +15oC to +35oC
Transport temperature: -20oC to +50oC
Storage temperature: 0oC to +50oC
Humidity operating: 30% to 90% (non-condensing)
Humidity storage/transport: 10% to 95% (non-condensing)
Clean the instrument by wiping the outer case with a lint free cloth lightly dampened with cleaning solution. Recommended cleaning and disinfection solutions are warm water with mild, non-abrasive cleaning solution (soap) and/or clinical wipes (e.g. Clinell Universal).